Jenkins, Docker build and Amazon EC2 Container Registry
by Sebastien Mirolo on Tue, 16 May 2017
 The major features released in Jenkins v2 are Jenkinsfile and Pipelines.
Today, we will see how to create a Jenkins job to build a docker
container out of a source repository then upload it to an Amazon EC2 Container
Registry.
The major features released in Jenkins v2 are Jenkinsfile and Pipelines.
Today, we will see how to create a Jenkins job to build a docker
container out of a source repository then upload it to an Amazon EC2 Container
Registry.
Configuring Jenkins
The steps to install Jenkins v2 have not changed much and we deploy a familiar setup with Jetty as the .war runner.
The source code is hosted on separate server (GitHub in this case). Even though the current build workload does not stress the Jenkins server much, we stumbled upon enough issues with Docker to warrant running the build on a separate worker machine. That is also a straightforward way to deal with Docker cache growing out of proportion with each additionnal build.
We will add a few plugins to the base Jenkins install.
The Network diagram looks like below.
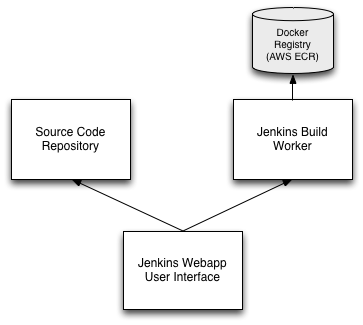
We want to control dissemination of credentials as much as possible. Keeping keys on the Jenkins Webapp server, the workflow will look like:
- Clone/Update the repository on the Jenkins webapp server
- Create a bundle on the Jenkins webapp server
- Copy the Bundle to the Jenkins build worker
- Build the Docker container on the Jenkins build worker
- Upload the container to ECR
If we haven't done it yet, we will need to add the ability for Jenkins to initiate a connection to an HTTP server.
$ sudo setsebool -P nis_enabled 1
It is required to be able to call on the AWS API.
Setting AWS IAM policies and security groups
Before we can configure Jenkins to use the Amazon cloud, we will need to set some IAM policies in AWS.
We setup an instance profile specific to the worker machines so they can upload the Docker containers that have been built to ECR.
{
  "Version": "2012-10-17",
  "Statement": [
    {
      "Effect": "Allow",
      "Action": [
        "ecr:*"
      ],
      "Resource": "*"
    }
  ]
}
The build workers are created in their own security group with access restricted to the Jenkins server only.
# Jenkins build worker
INBOUND
HTTP 80 sg-jenkins-server
SSH  22 sg-jenkins-server
We open port 22 for Jenkins to drop the bundle on the worker. We open port 80 because later on we will run unit tests against the webapp running in the Docker container that was just built.
We add the following permissions to the instance profile the Jenkins server runs on so that we can configure the EC2 Cloud (Manage Jenkins > Configure System) and start worker instances.
{
    "Version": "2012-10-17",
    "Statement": [
        {
            "Action": [
                "ec2:DescribeRegions",
                "ec2:DescribeKeyPairs",
                "ec2:DescribeInstances",
                "ec2:DescribeImages",
                "ec2:CreateTags",
                "ec2:RunInstances",
                "ec2:StartInstances",
                "ec2:StopInstances",
                "ec2:TerminateInstances"
            ],
            "Effect": "Allow",
            "Resource": "*"
        },
        {
            "Effect": "Allow",
            "Action": "iam:PassRole",
            "Resource": "arn:aws:iam::*aws_account_id*:role/jenkins-worker"
        }
    ]
}
Note that without the PassRole, we won't be able to create a worker EC2 instance and associate a jenkins-worker role to it.
On-demand Jenkins workers
First we will need to
build a worker AMI
with all the required tools pre-installed (i.e. docker and awscli).
We will also need to install java and wget
for the Jenkins agent otherwise the job might spin forever
with a "instance is offline" message.
In case you can ssh into the worker instance but there are problems with the Jenkins agent, take a look at the log in Manage Jenkins > Manage Nodes > the agent instance > See log for more details.
Once this is done, we browse to Manage Jenkins > Configure System, scroll down to the Cloud section and add an Amazon EC2 Cloud section.
- Set a Name (ex: Amazon)
- Check "Use EC2 instance profile to obtain credentials"
- Select a region
If you get an error, make sure ec2:DescribeRegions is present in your IAM policy.
- Copy/paste the content of the key used to ssh into the build workers as "EC2 Key Pair's Private Key"
If ec2:DescribeKeyPairs (Jenkins allows us to copy/paste the private content of an ec2-key pair but not specify the name of the key it corresponds to) and ec2:DescribeInstances (Jenkins uses that permission to implement a maximum total instances cap.) are present in your IAM policy, click on Test Connection will succeed.
Next we are adding an AMI and other parameters to
- AMI ID: The AMI we previously created
Clicking on Check AMI will succeed when ec2:DescribeImages ec2:RunInstances, ec2:StartInstances, ec2:StopInstances, and ec2:TerminateInstances are in the IAM policy.
- Verify the instance type is appropriate
- Set the security group to use
- Set the remote user to connect as
- Set the remote ssh port
- Under Advanced: Set IAM Instance Profile
- Under Advanced: Add Tags (ex: {Name:Jenkins Worker})
When adding tags, ec2:CreateTags must be in the IAM policy.
- Under Advanced: Set the Number of Executors
- Under Advanced: Set Instance Cap
The Labels field is used by Jenkins to filter jobs. We will add it to our docker build job settings and set Usage to Only build jobs with label expression here.
The init script is minimal.
set -x
set -e

# Insures we will be able to upload the image to ECR later on.
`aws ecr get-login --region *region*`
Once the cloud is configured, browse to Manage Jenkins > Manage Nodes, and make sure workers are set to "Provision via Amazon".
Creating the docker build job
Ready to start! Through the Jenkins, we will create a New Item and select "Pipeline project". Let's use project as a substitute for the name of our project/repo and take a look at the pipeline script.
node {
  stage('Bundle .tar.gz') {
    sh '/usr/local/bin/dws build --nonative git@github.com:*user*/*project*.git/*project*.xml'
    sh 'tar czhf *project*.tar.gz *project*'
    stash includes: '*project*.tar.gz', name: '*project*'
  }
}
node('ec2') {
  stage('Build/Upload Docker container') {
    unstash '*project*'
    sh 'tar xf *project*.tar.gz'
    sh 'rm *project*.tar.gz'
    dir('*project*') {
      def image = docker.build '*project*:snapshot'
      docker.withRegistry('https://*aws_account_id*.dkr.ecr.us-west-2.amazonaws.com/*project*'){
          image.push 'latest'
      }
    }
  }
}
The first stage runs on the Jenkins webapp server. It will configure and prepare the code directory first (we use dws here but that is just specific to us). Then we create a .tar.gz bundle on everything that needs to be copied to the Jenkins build worker.
Side note: if our project clones the repository through a ssh command, we will need to have the keys available to Jenkins. Example:
$ cat /usr/share/jetty/.ssh/config
Host github.com
    Port 22
    IdentityFile %d/.ssh/github.com_rsa
    IdentitiesOnly yes
The second stage runs on the Jenkins build worker. It will extract the bundle, build the Docker container and upload it to ECR. This stage requires that the Jenkins worker AMI was properly configured.
A final side note on the Dockerfile. We definitely don't want to push credentials into the Docker image so any private repository and other resources that require authentication credentials to access should be downloaded to the Jenkins Server, then pushed to the worker and ultimately copied into the Docker image. In short:
# we want the Dockerfile to look like
ADD ./reps
# instead of
RUN git clone git@github.com/*user*/*private-project*.git
More to read
If you are looking for related posts, Jenkins, SELinux and Python Coverage and Continuous Integration for a Javascript-heavy Django Site are good reads.
More technical posts are also available on the DjaoDjin blog. For fellow entrepreneurs, business lessons learned running a subscription hosting platform are also available.
by Sebastien Mirolo on Tue, 16 May 2017