Browser direct upload to S3
by Sebastien Mirolo on Wed, 10 Jun 2015
 Dealing with large files over HTTP has always been challenging, Doing so in
the context of access control and user authentication even more so.
Once faced with that first (too) big file, you will most likely search for
Nginx direct file upload without passing them through backend
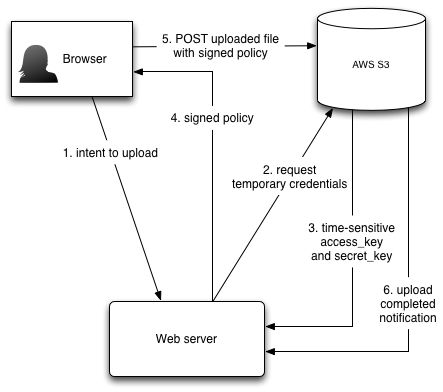
or if you rely on AWS, look into S3 direct upload from browser.
We will see in this post how to do the latest.
Dealing with large files over HTTP has always been challenging, Doing so in
the context of access control and user authentication even more so.
Once faced with that first (too) big file, you will most likely search for
Nginx direct file upload without passing them through backend
or if you rely on AWS, look into S3 direct upload from browser.
We will see in this post how to do the latest.
Policies and assume role
First we need to create a role (ex: media-upload) that permits authenticated users to write to the S3 bucket.
{
    "Version": "2012-10-17",
    "Statement": [
        {
            "Sid": "Stmt1433264378000",
            "Effect": "Allow",
            "Action": [
                "s3:GetObject",
                "s3:PutObject",
                "s3:PutObjectAcl",
                "s3:PutObjectVersionAcl"
            ],
            "Resource": [
                "arn:aws:s3:::bucket/*",
                "arn:aws:s3:::bucket"
            ]
        }
    ]
}
Second we setup STS Permissions such that we can create temporary security credentials.
While testing from a developer local machine with a developer IAM account, the first error message we stumble upon is
User arn:aws:iam::********:user/**** is not authorized to perform: sts:AssumeRole on resource: media-upload
Here we note that even though it is our own account that will be used to assume
the role and create temporary security credentials, from AWS perspective we
must configure everything as if we were granting AssumeRole
to a third-party AWS account.
We will add the Allow to AssumeRole policy to the group such that other developers can also test direct uploads from their account.
{
    "Version": "2012-10-17",
    "Statement": [
        {
            "Effect": "Allow",
            "Action": "sts:AssumeRole",
            "Resource": "arn:aws:iam:::role/media-upload"
        }
    ]
}
It is not enough to allow group members to assume the role. We must also add our users to the "Role Trust Relationships" as specified in Requirements for assuming a role:
- The caller must have permission to call
AssumeRolefor the specific role. - The role defines the caller's AWS account ID as a trusted entity.
- The caller must use IAM user credentials to assume a role.
- If the role has an external ID defined, the caller must pass that external ID when calling
AssumeRole.
{
  "Version": "2012-10-17",
  "Statement": [
    {
      "Sid": "",
      "Effect": "Allow",
      "Principal": {
        "Service": "ec2.amazonaws.com",
        "AWS": "arn:aws:iam::********:user/****"
      },
      "Action": "sts:AssumeRole"
    }
  ]
}
Two things to note here:
- The AWS account must be explicitly specified. Implicit short-hand
arn:aws:iam:::user/...does not work. - The Trust Relationship must be defined for a user. Trying
to use
arn:aws:iam::********:group/devgets the AWS console to spin forever...
CORS Headers
Since the browser will load the page from our Web server but generate a POST request on S3, we must configure CORS headers on the S3 bucket to allow it.
Typically if we do not do anything, Chrome will display an error message like following in the console window:
XMLHttpRequest cannot load https://buckets3.amazonaws.com/.
No 'Access-Control-Allow-Origin' header is present on the requested resource.
Origin 'https://our-domain-name' is therefore not allowed access.
The response had HTTP status code 403.
In the S3 AWS Console, we browse to bucket > Properties > Permissions > Edit CORS Configuration, then edit the text in the CORS Configuration Editor:
<?xml version="1.0" encoding="UTF-8"?>
<CORSConfiguration xmlns="http://s3.amazonaws.com/doc/2006-03-01/">
    <CORSRule>
        <AllowedOrigin>*</AllowedOrigin>
        <AllowedMethod>POST</AllowedMethod>
        <MaxAgeSeconds>3000</MaxAgeSeconds>
        <AllowedHeader>*</AllowedHeader>
    </CORSRule>
</CORSConfiguration>
We will tighten the CORS configuration for production setups. To allow developers to connect from their local machine, we must be a little more liberal.
Signing policies
At this point we are able to create temporary credentials and post requests to S3. It remains to create a policy and sign it correctly.
SignatureDoesNotMatch kept popping up no matter what.
Browsing through the documentation on uploading to S3 through a browser POST
form did not help. Finally, searching Google for "signing AWS requests"
lead to Signature Version 4 Test Suite
and Deriving the Signing Key using Python.
I was not able to reproduce the reference signature in the testsuite but
that was enough information to be confident the code
was correct. Tip: use json.dumps(...).encode("utf-8") to generate
the utf-8 policy that will be base64 encoded and signed.
Example Policy:
{
  "expiration": "2015-06-11T00:00:00.0000Z",
  "conditions":[
      {"bucket": "bucket-name"},
      {"x-amz-algorithm": "AWS4-HMAC-SHA256"},
      {"x-amz-credential": "temporary-access-id/20150610/us-east-1/s3/aws4_request"},
      {"x-amz-date": "20150610T000000Z"},
      {"x-amz-security-token": "temporary-security-token"},
      ["starts-with", "$key", ""]
  ]}
Example HTML form:
<form method="post" action="https://bucket.s3.amazon.com/"
      enctype="multipart/form-data">
    <input type="input"  name="key" value="filename" />
    <input type="hidden" name="x-amz-algorithm" value="AWS4-HMAC-SHA256" />
    <input type="hidden" name="x-amz-credential" value="temporary-access-id/20150610/us-east-1/s3/aws4_request" />
    <input type="hidden" name="x-amz-date" value="20150610T000000Z" />
    <input type="hidden" name="x-amz-security-token" value="temporary-security-token" />
    <input type="hidden" name="policy" value="base64-encoded-policy" />
    <input type="hidden" name="x-amz-signature" value="policy-hex-signature" />
</form>
Further consideration
Now that we are able to upload files directly to S3 using temporary credentials,
it is time look into success_action_redirect and
success_action_status parameters, then figure out how to do
upload progress notification. Sign up to the mailing list and stay tuned!
More to read
If you are looking for more AWS posts, Deploying on EC2 with Ansible and PostgreSQL, encrypted EBS volume and Key Management Service are worth reading next.
More technical posts are also available on the DjaoDjin blog, as well as business lessons we learned running a SaaS application hosting platform.
by Sebastien Mirolo on Wed, 10 Jun 2015