Using the API to onboard a Club member
- Skill required
- Basic Web Programming
In this tutorial, we have a sports club application which lets parents onboard their child into the app. Club managers must accept the request after verifying membership status.
We will see how to create an HTML page and the associated Javascript code for a parent to enter information about their child (ex: name, photo) and create a request sent to the club manager.
Prerequisites:
- URL for a Website hosted on DjaoDjin (ex: livedemo.djaoapp.com) - Register
- API Key to connect the hosted Website (ex: ABC***123) - How do I get my API Keys?
Notes on command line snippets
On command line snippets, lines starting with a $ character indicate
a shell prompt, or a command for you to type. Lines that do not start
with a $ character show a sample output from that command.
Example:
$ whoami
ec2-user
Text edits within source files are shown in universal diff format with lines preceded by a '-' sign to be removed and lines preceded by a '+' sign to be added. Example:
 def set_default_profile():     # This line for context, to be kept as-is
-    profile = 'abc'            # This line to be removed
+    profile = 'cde'            # This line to be added
     return profile             # This line for context, to be kept as-is
The full source code for this tutorial is available on GitHub.
Setting up
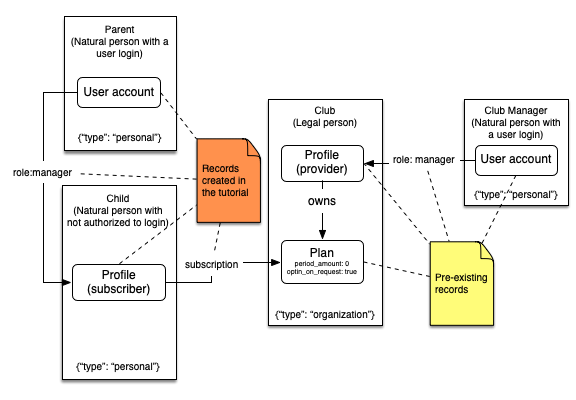
First we will need a plan with a zero period amount and a optin_on_request
set to true in order for the Club manager to manually accept the request
to attend a class offered by the Club.
Then we create an HTML page with the expected input field in the onboarding workflow (see public/index.html).
Since we are going to write the Javascript code in a separate file ([public/app.js]), we need to serve the HTML page through a Webserver instead of directly loading it as a file inside a browser.
Any Webserver will do. Here we will run the embed python Webserver:
$ python -m http.server --bind 127.0.0.1 --directory public
Then load the URL http://127.0.0.1/index.html in a Web browser.
Basic App workflow
We will intercept the Web form submit action, and call multiple DjaoApp APIs to create the following models in the database:

The workflow consists of the following steps (full source code available in public/app.js):
- Register a user account for the parent
- Create the child profile
- Subscribe the child to classes by adding plans to the parent's cart, and checking out the cart on the child's profile.
Preventing notifications
The basic workflow will generate an order confirmation notification when the cart is checked out.
We can either rewrite the notification theme template to send a meangingful message to the user to notify them the registration to the class in pending, or disable the notification altogether.
There are three ways to disable email notifications:
- disable a single notification for a specific user
- disable a single notification site-wide
- disable all e-mail notifications site-wide
Uploading a profile picture
We can POST the profile picture file directly
to /api/profile/{profile}/picture when we are using DjaoDjin platform
for hosting media assets. Otherwise, if we are hosting pictures
on a different platform, we just POST the URL provided by that platform
to /api/profile/{profile}/picture.
Adding meta information
We add meta information intrinsic to the child (date of birth, gender)
at the time we create the profile through the extra field.
const dateOfBirth = document.getElementsByName('date_of_birth')[0].value;
const gender = document.getElementsByName('gender')[0].value;
fetch(API_URL + ['/api/users/' + user.username + '/profiles'](https://www.djaodjin.com/docs/reference/djaoapp/2025-02-17/api/#users_profiles_create), {
    ...

    body: JSON.stringify({
        ...
        extra: {date_of_birth: dateOfBirth, gender: gender}
    })
})
We add meta information associated to the relationship (parent, guardian) to the role itself.
const contactKinship = document.getElementsByName(
    'contact_kinship')[0].value;
fetch(API_URL + '/api/profile/' + profile.slug + '/roles/manager/' + user.username, {
    ...

    body: JSON.stringify({
        ...
        extra: {kinship: contactKinship}
    })
})
Adding multiple parent/guardian to the child profile
We add multiple parent/guardian by creating a role for each of them.
By default we can only grant existing users a role on a profile. If we want
to invite parent/guardian not yet registered, we will use the ?force=1
query parameter.
Error conditions to take into consideration
As your Web application gains in popularity, and life follows its course (marriage, divorce, birth, adulthood, etc.), it will be increasingly common that the child profile and/or one or all parent/guardian user accounts already exists in the system. These are "error" conditions you should expect to handle gracefully in the onboarding workflow.
Along the same line, the relationship between child profiles and parent/guardian user accounts might already present or not. A common occurence is for one parent/guardian to register the family, then the second parent/guardian to do the same by accident.
It is also possible the profile is already subscribed to the class. In short, you must assume at least a subset of the records you are inserting in the database during onboarding might already be present.
The last obvious "error condition" to watch out for is that child contact e-mail might be different from the parent e-mail address. As well a parent might add another guardian using an e-mail address different from the primary e-mail address already present in the system for that user.
- Need help?
- Contact us
- Curious how it is built?
- Visit us on GitHub