Setting up Hubspot
by Sebastien Mirolo on Fri, 25 Aug 2023
 We have been using Zendesk for 5 years now. They have made changes recently
that makes it more difficult to respond to tickets quickly and effectively
to the point we decided to look at alternative solutions.
We have been using Zendesk for 5 years now. They have made changes recently
that makes it more difficult to respond to tickets quickly and effectively
to the point we decided to look at alternative solutions.
Introduction
Zendesk was never really a perfect fit but was easy to setup a week before we onboard a thousand suppliers for The Sustainability Project in 2018.
The fact that we paid annually but are charged an additional $1 every month is annoying. (by the way if you are interested in how to implement monthly, quarterly, annual and multi-year subscriptions properly, take a look at DjaoDjin Open Source Software stack.) The latest updates to Zendesk User Interface first prevented to easily copy/paste all e-mail addresses copied on a ticket, then in August 2023, they made it difficult to even find the e-mail address of the customer creating the ticket. Coupled with a weird "you cannot tag tickets after a time period" policy and the fact Zendesk product structure and pricing was never friendly to a centralized support function across multiple Web properties, we decided to look elsewhere.
Hubspot was a good candidate because it would enable to respond to tickets, and slowly start using the CRM functionality it is known for.
Hubspot: Contact through e-mail
We signed up for a Service Starter plan. Onboarding was pretty straightforward and getting a first-year discount without asking was nice.
The first step was connecting the multiple help e-mail addresses across the various Web properties to Hubspot. At first the User Interface is a bit confusing. I relied on the Search functionality quite a bit, but after a while you get to find what you are looking for where you expect it to be. Repetitive conditioning always works.
You will need to forward e-mails to a specific support account at your e-mail domain to an Hubspot e-mail address. To do so, locate the "Forwarding address" under "Inboxes" > "Channels" > "Email". Copy/paste the Forwarding address and setup your e-mail provider to forward e-mails for the support account to that Hubspot e-mail address.
I attempted to get GMail to forward the Zendesk-bound support e-mail account to both Zendesk and Hubspot in order to facilitate the transition but that was not possible. As GMail states: "You can only automatically forward all your messages to one account."
On Hubspot, you find all information related to the e-mail server under Website > Domain & URLs. There we find the SPF record and DKIM records under Connect a domain.
Completing the wizard, everything looks verified. There is a Done button. Then back on the Domain & URLs page, we see a Setup is ready to be continued message and the Email (sending) setting specifies Not connected. Clicking on Continue brings back the happy all verified page with the done button... I ran through that loop for about 15 min, then suddenly everything looks fine and the DKIM/DNS is connected.
Testing reveals that sending an e-mail to a connected shows up properly as a ticket from the expected Web Property. - All good!
Agents coming from Zendesk are in a bit of a shock though. The Hubspot interface shows a lot of information, not necessary useful at first to respond to a ticket. Tickets are also shown in the "Tickets" view while also present in the "Inbox" view. These are two different views where some information is easily accessible in one or the other view. There is no such thing as a canonical "ticket view" as far as I can tell in Hubspot.
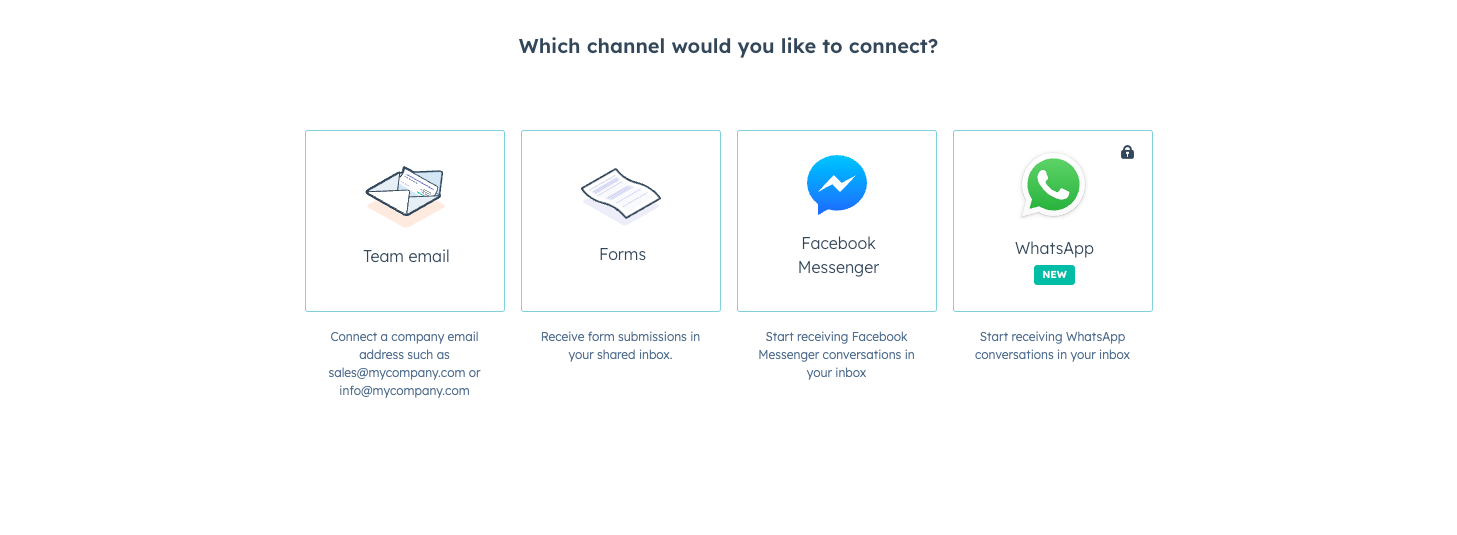
Hubspot: Contact through live chat
The second channel we connected is the live chat widget.
By default, the name at the top of the chat widget is the primary holder of the Hubspot account. You will most likely also want to update it to the company chatbot name or anything else you like to be displayed in the top bar of that Chat widget.
The settings is not straightforward to find by just browsing around but if you type "Chat heading" in the search box in the top menu bar, you quickly find it under "Chatflows" > "Display" > "Choose chat avatar".
Testing the chat widget as a anonymous visitor works well, but it does not automatically create a ticket. That's where the roots of Hubspot as a CRM show. Everything is a conversation in the Inbox, but not everything is a ticket.
Identifying visitors
We are running a SaaS and we have all the information associated to an authenticated user, but live chats show up as anonymous visitors.
It should be straightforward to pass the authenticated user contact information to the live chat widget but that is where things started to be complicated. A quick Google search pops up Visitor identification on Hubspot Developers site.
The first warning message on the tutorial is that the visitor identification API requires a Professional or Enterprise subscription. Looking into "Account and Billing", it is unclear if the subscription we pay for qualifies as "Professional" or "Enterprise". Clicking through to "Manage subscriptions", it is no clearer which plan we should upgrade to insure we have access to the visitor identification API. So we will just keeping moving forward with the tutorial and figure it out as we go - hopefully.
If you copy/paste the first example, there is a typo (extra "'" quote character) that prevents the command line to execute and there are missing content-type header specification. Hopefully calling APIs from the command line is something I do on a daily basis here, so we are turning the example into.
$ curl -sD - -X POST \
   -H 'Accept: */*' \
   -H 'Content-Type: application/json; charset=UTF-8' \
   -d '{"email": "gob@bluth.com","firstName": "Gob","lastName": "Bluth"}' \
   https://api.hubspot.com/conversations/v3/visitor-identification/tokens/create
{
  "status":"error",
  "message":"Authentication credentials not found. This API supports OAuth 2.0 authentication and you can find more details at https://developers.hubspot.com/docs/methods/auth/oauth-overview",
  "correlationId":"******",
  "category":"INVALID_AUTHENTICATION"
}
Running the example in the tutorial without authentication was odd. At least we know now where to look to create and use an API token.
The first message on the authentication overview page is that API Keys are not supported anymore. There is a lot of technical jargon on the page, but basically it means the API became so big Hubspot needed to partition API calls into various scopes and introduce scope-restricted access tokens. Otherwise authentication is pretty standard, i.e. through an Authorization HTTP Header.
After browsing around the settings, we find "Private Apps" and create one of those tokens. We will call the App "Identify Visitor", then moving to "Scopes", we realize the visitor identification tutorial doesn't specify which scopes we need. We guess "crm.objects.contacts" read/write and specify that one. We get a token and make a second call to the API.
$ curl -sD - -X POST \
   -H 'Accept: */*' \
   -H 'Content-Type: application/json; charset=UTF-8' \
   -d '{"email": "gob@bluth.com","firstName": "Gob","lastName": "Bluth"}' \
   -H 'Authorization: Bearer *****' \
   https://api.hubspot.com/conversations/v3/visitor-identification/tokens/create
{
  "status":"error",
  "message":"This app hasn't been granted all required scopes to make this call. Read more about required scopes here: https://developers.hubspot.com/scopes.",
  "correlationId":"*****",
  "errors":[{
    "message":"All of the following scopes are required.",
    "context":{
      "requiredScopes":[
        "conversations.visitor_identification.tokens.create"
      ]
    }
  }],
  "links":{"scopes":"https://developers.hubspot.com/scopes"},
  "category":"MISSING_SCOPES"
}
OK. So now we know which scopes we must add. I copy/paste the 'conversations.visitor_identification.tokens.create' scope into the search window. It shows under "Standard" but a pop-up indicates "Scope is unavailable. You account doesn't have access to this scope." with no further clue. It is just really odd pricing that we can create contacts under the current subscription plan but cannot access the visitor identification API.
None-the-less the tutorial hints that we need a Professional or Enterprise subscription to use that API/scope. It doesn't seem I am able to get a consistent price for either a Professional or Enterprise subscription (it changes depending which pricing page I look at) but what seems certain is that the next plan up from our current subscription is 10x more expensive. That's a lot for a feature that is one of the most basic API call. (on a side note, if you are interested in a fully featured API for managing a SaaS, look at DjaoDjin Profiles, Billing and Access Control reference API).

Hubspot: Booking time with a Customer Success Agent
Under Sales > Meetings, Hubspot have an option to host a scheduling / booking time hosted page. As many customers we work with are Microsoft Teams users, we switched from Zoom to Teams. We are still new to Microsoft products so we had no idea what to pick when Hubspot prompted us to connect with Microsoft Outlook or Microsoft Exchange. We want to connect with Microsoft Teams...
Since Hubspot says "Calendar Sync is not available for Microsoft Exchange yet.", we picked the Microsoft Outlook option. It seemed to work. In fact it did work but not entirely. The calendar invite would not show up with a online meeting video link. The "add videoconference link" in Hubspot would only show a Microsoft Teams option after 3 days of struggle, one support ticket to Hubspot and "turning it off and on" again - I mean "re-associating" Hubspot and Teams.
The key part seems to have been Install the Microsoft Teams app from the Hubspot Marketplace, and click "accept" every time Hubspot or Microsoft is asking to sign your live away.
In the process, I found out that there is a Bookings with me link in the Outlook Calendar settings (an option that disappear once setup but that can be found back under Go to my booking page in the Calendar). The user interface is looking old, asks us to sign in to Microsoft on the first page (though we can continue as anonymous). It does ask us to verify our e-mail address (good) and sends us an invite with a Teams calendar link. The meeting shows up in Hubspot.
In the process, I also found out the one API call you need to schedule a calendar invite with a Teams video link.
I tried to change the default URL for Meetings URL
(through Your Preferences (in left sidebar) >
Calendar) but after creating a new scheduling page and making
it the default (see Sales (in the menu bar) >
Meetings), I am left with a two parts URL path
(username/internal-name) because even though
the default meetings URL shows https://meetings.hubspot.com/username
I can't seem to associate a Sales Meeting to it.
The URL https://meetings.hubspot.com/username
returns a 404 Not Found.
Scheduling a product demo
We wanted to create a scheduling page for a 30 min product demo and or Q&A for customers. The round robin scheduling feature seems perfect for it.
Go to Sales > Meetings, click on Create scheduling page then choose Round robin.
The Internal name shows up in the public URL bar and cannot be changed afterwards. As analytics gets computed per page, you might not want to create new scheduling pages for very similar events. So choose the internal name wisely.
Strangely enough I created a round robin scheduling page but the organization shows with my name. On the second step of the four step process, I can add team members but only my name is showing up, not any of the team members we have. Could it be because they haven't connected their calendar to Hubspot yet?
On the scheduling step, we accept the default. In the Automation step, it is possible to send a test e-mail. The e-mail arrives from username=company@notifybf2.hubspot.com. It is not just because it is a test email. That "From:" e-mail address is also used from meetings confirmation from Hubspot. Since Teams will send a calendar invite and there are no useful additional information in the Hubspot confirmation e-mail, we just disable it in the Automation step.
When I tried to book a time using my personal gmail address, Microsoft Teams receives a notification that GMail bounced the calendar invite to the prospect because of an Exchange-related IP block. It is odd error where documentation says to contact Microsoft support with no contact information. Luckily a quick Google search finds Microsoft support contact information. Shortly after creating the ticket, some from Microsoft called. I could figure out exactly what they said but it seems my @djaodjin.com e-mail address Hubspot is using was creating some hickups with the @teams.onmicrosoft.com Microsoft created for the business account. The support staff fixed and told me to try again in an hour. As of writing, it is now working. People can book time for a 30 min product demo!
Hubspot: A few weeks in
A few weeks in, we have a better understanding of Hubspot technical and business constraints and what it would take to move forward with it.
Good points
- 2 Agents by default. Yeah!
- Support multiple Web properties without breaking the bank
- E-mail, Chat and online meetings scheduling for support options
- Potential to integrate with CRM, Sales activities
Limitations
- No gradual pricing curve. Next plan up is 10x more expensive
- Identifying Chat visitors requires an Enterprise plan
- Does not automatically create tickets from Chat conversations
- Confusing at first for support agents
More to read
If you are looking for more posts about what it is like to build a boutique SaaS product, you might enjoy First days with Zendesk, Vendor Landscape for Enterprise-Ready SaaS, or Operating a SaaS product through ownership changes
More business lessons we learned running a SaaS application hosting platform are also available on the DjaoDjin blog. For our fellow engineers, there are in-depth technical posts available.
by Sebastien Mirolo on Fri, 25 Aug 2023