Docker on Amazon Elastic Beanstalk
by Sebastien Mirolo on Sat, 26 Jul 2014
 We have recently played with Docker
on a Fedora 20 Virtual Machine. What we are looking to achieve Today is
to run a Docker container on Amazon Elastic Beanstalk (AEB).
We have recently played with Docker
on a Fedora 20 Virtual Machine. What we are looking to achieve Today is
to run a Docker container on Amazon Elastic Beanstalk (AEB).
 Most posts assume you have a fair understanding of the AWS
infrastructure, yet most of AWS documentation is pretty incomprehensible
until you actually know the AWS tools and services in and out. So
we will start here fresh from the minute after you pull
your credit card, sign up for an AWS account and Amazon gives you an OK
to play. You can skip directly to
the code, You can read about the unexpected stumbles
along the way or keep reading linearly to the next section.
Most posts assume you have a fair understanding of the AWS
infrastructure, yet most of AWS documentation is pretty incomprehensible
until you actually know the AWS tools and services in and out. So
we will start here fresh from the minute after you pull
your credit card, sign up for an AWS account and Amazon gives you an OK
to play. You can skip directly to
the code, You can read about the unexpected stumbles
along the way or keep reading linearly to the next section.
Identity, Access Management and Security Groups
Every connection to the AWS services requires authentication keys. The AWS resources (EC2, EBS, S3, etc.) we create are billed to our account. Since the advantage of being in the Cloud is to scale up and down the resources we use as needed, at some point we will have a service hosted in the Cloud that create resources on our behalf.
If one of the cloud machine gets hacked, not only we might loose customer data (embarrassing) but we might also end-up with a huge bill from Amazon (serious stuff). So, first thing first, we thoroughly read through the Identity and Access Management (IAM) Documentation. As of April 21st 2014, Amazon recommends to create IAM users instead of using the root AWS keys for the account. IAM is here to stay for very good reasons. It is awesome! Later we will create IAM Roles for Amazon EC2 to efficiently manage access control.
The main concepts of Identity and Access Management are
- users
- groups
- policies
- roles
- instance profiles
Access to EC2 instances is also controlled through virtual private clouds (VPC) and through a security groups. How does that fit within IAM? Loosely. VPCs and security groups are closer, in design and operation, to IP-level firewalls than they are to IAM. I would venture this is historical baggage and with a little bit of thought Amazon will be able to retrofit security groups into the IAM framework.
AWS Resources
With a good handle on IAM, next is to learn about are basic AWS resources:
All other AWS services are built on top of those. It is a lot easier to understand Elastic Beanstalk or any other Amazon services afterwards. It always boils down to EC2, EBS and S3.Elastic Beanstalk Documentation
The Elastic Beanstalk documentation is confusing, even misleading at times, the Docker section is incomprehensible until you successfully deploy a Docker container on Elastic Beanstalk. Then it kind of makes sense. The only piece of information that gives any real clue to start are the diagrams in the Architectural Overview.
Trial and errors lead to the following steps in bringing up an application on Elastic Beanstalk:
- Create a zip file you want to be unpacked on the EC2 instances.
By convention, the zip file will contain a specific directory called .ebextensions/ which contains files suffixed by .config. Those config files are how the configuration of an EC2 instance is done before any Docker/Python/Ruby/Etc. specific steps are executed. Syntax for the .config files can be found here.
- Upload the zip file to an S3 bucket
- Follow the steps to create an environment on Elastic Beanstalk.
Whenever you must modify a specific option settings (Namespace, OptionName, Value), refer to this single page.
Getting Started
With a good handle on IAM and AEB environments, the deployment steps we are trying to achieve look like this:
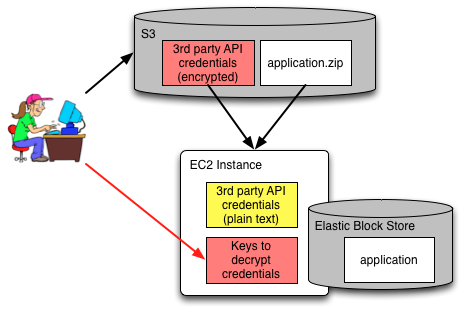
The setup might seem complicated until you remember the #1 and #2 rules of public Clouds.
- Sensitive data that potentially makes it to non-volatile storage should be encrypted.
- Strive to fully understand the channels on which Keys travel.
It remains to pick the tools for the job. The AEB documentation is written with an eb command line tool in mind. With a little experience, we just have to read the installation process ("add the unzipped directory to your PATH") to realize the tool is poorly thought out. When we poke a little around the code, we find "import lib" statements (who names their Python module lib?) and plenty of assumptions to find data files in the bin/ directory where eb is installed. This is guaranteed nightmares to mechanically configure a developer machine. This tool is useless to us.
The Eucalyptus euca2ools have the advantage to come as a macports package. Unfortunately they do not seem to support Elastic Beanstalk (maybe they do under a different name). Either way, through code samples in a post on ThoughtWorks, we find that AWS command-line tools can be installed through pip. Perfect.
$ pip install awscli
$ aws elasticbeanstalk help
AWS Console Steps
To bootstrap, we create an IAM user in the AWS Console and give her permissions to execute API commands to the IAM service. Without permissions our newly created user won't be able to do anything.
Because we will grow the group of "Administrators", people that can deploy code on elasticbeanstalk, we create a group and and follow the wizard to associate a policy template with the group Until we figure the full deployment process, we select "IAM Full Access", "Amazon EC2 Full Access", "Elastic Beanstalk Full Access". We add our user to that group. Later, we will revisit which permissions are truly necessary.
We download two important values to access the AWS API from the web console:
- aws_access_key_id
- aws_secret_access_key
$ pip install -U boto
$ cat ~/.boto
[Credentials]
aws_access_key_id = YOUR_AWS_ACCESS_KEY_ID
aws_secret_access_key = YOUR_AWS_SECRET_KEY

# or
$ export AWS_ACCESS_KEY_ID=YOUR_AWS_ACCESS_KEY_ID
$ export AWS_SECRET_ACCESS_KEY=YOUR_AWS_SECRET_ACCESS_KEY
IMPORTANT: All commands are relative to a "region" thus we also specify the default region, here us-west-2. Unfortunately I couldn't find any way to do that through the boto config file so we add the region to the shell.
$ export AWS_DEFAULT_REGION=us-west-2
Preparing sensitive runtime data
For example, we connect to the Stripe API for processing payments. The Stripe credentials are thus needed at runtime by the our application. Other credentials and secrets might also be necessary to properly run our service.
If we were running our web service on a machine we own, we would create a file in /etc and restrict permissions to it through SELinux.
In the cloud, we cannot be sure what will happen to the physical disks once an EC2 instance is terminated. We could encrypt an EBS volume, create an etc/ file on it and then mount the disk to the instance after it started. I doubt we can mount the same disk at the same time to multiple instances, even if read-only.
On the other hand, we can upload an encrypted file to S3 and furthermore restrict its access through IAM roles. That is what we do here.
We create an S3 bucket that will store the encrypted credentials, a role and an instance profile the EC2 instances will use to access the S3 bucket.
$ aws s3api create-bucket --bucket eb-minimal-flask-credentials
$ cat assume-role-policy.json
{
  "Version": "2012-10-17",
  "Statement": [
    {
      "Sid": "",
      "Effect": "Allow",
      "Principal": {
        "Service": "ec2.amazonaws.com"
      },
      "Action": "sts:AssumeRole"
    }
  ]
}
$ aws iam create-role \
    --role-name eb-minimal-flask \
    --assume-role-policy-document file://assume-role-policy.json
$ aws iam create-instance-profile \
    --instance-profile-name eb-minimal-flask-instance-profile
$ aws iam add-role-to-instance-profile \
    --role-name eb-minimal-flask
    --instance-profile-name eb-minimal-flask-instance-profile
$ cat eb-minimal-flask-credentials.json
{
  "Version": "2012-10-17",
  "Statement": [
    {
      "Sid": "S3ReadOnlyPerms",
      "Effect": "Allow",
      "Action": [
        "s3:ListBucketVersions",
        "s3:GetObjectVersion",
        "s3:ListBucket",
        "s3:GetObject"
      ],
      "Resource": [
        "arn:aws:s3:::eb-minimal-flask-credentials/*",
        "arn:aws:s3:::eb-minimal-flask-credentials"
      ]
    }
  ]
}
$ aws iam put-role-policy \
    --role-name eb-minimal-flask \
    --policy-name eb-minimal-flask-credentials-policy \
    --policy-document file://eb-minimal-flask-credentials-policy.json
Let's now encrypt our credentials file and upload it to S3. We use here a DES3 CBC cipher with a 24-byte key and 8-byte iv. We could have used any other cipher we liked as long as the decryption routine running on EC2 matches.
$ openssl des3 -e \
    -K 123456789012345612345678901234560000000000000000 -iv ABCDEFABCDEFABCD \
    -in credentials -out credentials.enc -p
$ aws s3 cp credentials.enc s3://eb-minimal-flask-credentials/credentials
In the above commands, -p will print the key and iv, which is useful to debug the decryption code. Also let's make sure we can decrypt the file locally before moving forward.
$ openssl des3 -d \
    -K 123456789012345612345678901234560000000000000000 -iv ABCDEFABCDEFABCD \
    -in credentials.enc -out credentials.dec
$ diff credentials credentials.dec
Uploading the Application
We are getting there. Let's now create and upload the application zip file to S3.
$ aws s3api create-bucket --bucket eb-minimal-flask
$ zip -r eb-minimal-flask.zip Dockerfile .ebextensions
$ aws s3 cp eb-minimal-flask.zip s3://eb-minimal-flask/eb-minimal-flask.zip
# create application and application version in one step
$ aws elasticbeanstalk create-application-version \
    --application-name eb-minimal-flask \
    --version-label 0.1 \
    --source-bundle S3Bucket="eb-minimal-flask",S3Key="eb-minimal-flask.zip" \
    --auto-create-application
Creating an Environment
Finally, the moment of truth has arrived. Let's create an environment and bring our application live.
$ aws elasticbeanstalk create-environment \
  --application-name eb-minimal-flask \
  --version-label 0.1 \
  --environment-name eb-minimal-flask-env \
  --solution-stack-name "64bit Amazon Linux 2014.03 v1.0.1 running Docker 1.0.0"
  --option-settings '[{"Namespace":"aws:autoscaling:launchconfiguration",\
"OptionName":"IamInstanceProfile","Value":"eb-minimal-flask-instance-profile"},\
{"Namespace":"aws:elasticbeanstalk:application:environment","OptionName":\
"CREDENTIALS_KEY","Value":"123456789012345612345678901234560000000000000000"},\
{"Namespace":"aws:elasticbeanstalk:application:environment","OptionName":\
"CREDENTIALS_IV","Value":"ABCDEFABCDEFABCD"}]'
We see here we passed the decryption key to the elasticbeanstalk environment. They will be available in our application through
decrypt_key = os.getenv("CREDENTIALS_KEY").decode("hex")
decrypt_iv = os.getenv("CREDENTIALS_IV").decode("hex")
Hopefully the keys don't get to be passed into malicious hands on the way nor stored on disk. This is something we still need to make sure about...
The environment will take a few minutes to be up-and-running then go Green. We can check its status with describe-environments.
$ aws elasticbeanstalk describe-environments
...
    "Status": "Green",
    "CNAME": "eb-minimal-flask-env-pzc2w9ybdd.elasticbeanstalk.com",
...
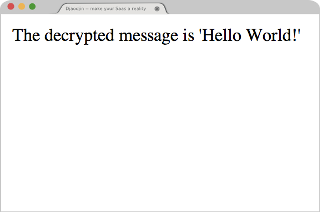
It is time to use our favorite browser and load the page pointed by the CNAME variable (here: http://eb-minimal-flask-env-pzc2w9ybdd.elasticbeanstalk.com). Eh voila, the decrypted message is showing up.
Lessons Learned
- Containers do not contain. That is a major lesson for anyone who thought to use Docker to do multi-tier hosting on the same machine. It is a big no.
- Docker Containers are good for resource quotas and throttling. It comes from Docker's past history with LXC.
- Without caching Docker is a lousy system setup tool. It is like starting from a bare image and running an installation shell script, every build. Whenever possible elasticbeanstalk update-environment will re-run docker build on the live EC2 instance instead of going through a full terminate/create cycle to speed things up. That means an update-environment might not actually deploy any changes live. The docker -no-cache option is a workaround, not a long-term solution.
- We can use .ebextensions/*.config to run pretty much any command on the EC2 instance before docker build is started.
Side Notes
Following are two unexpected stumbles along the way of running a Docker container on Elastic Beanstalk. You might have landed to this page because you searched for solutions to one of the issues described here.
Docker caching
The documentation to deploy a Docker image implied that a Dockerfile was enough. Since we were going to deploy our sample webapp from a public github repository, we used the following Dockerfile (there is another sidenote on why this particular Dockerfile did not build as expected with Docker 1.0 on Fedora 20):
FROM ubuntu:12.04

RUN apt-get -y update
RUN apt-get -y install python python-pip git-core
RUN git clone https://github.com/smirolo/eb-minimal-flask.git
RUN pip install eb-minimal-flask/requirements.txt

EXPOSE 80

CMD ["/usr/bin/python", "eb-minimal-flask/hello.py" ]
After pushing changes to the github repository, updating the Elastic Beanstalk environment, not seeing any changes, digging through the logs and finding out that Docker was caching the results of the git clone command, I was left with the resolve to pass the -no-cache command line option to docker build through the AEB configuration process. That entailed creating a .ebextensions/setup.config file and deploying to AEB from a zip archive.
$ cat .ebextensions/setup.config
files:
  "/etc/default/docker":
    mode: "000444"
    content: |
      DOCKER_OPTS="-no-cache"
SELinux, CentOS and Python-pip
Easier said than done. When I used the following Dockerfile, I hit this SELinux issue.
FROM ubuntu:12.04

RUN apt-get -y update
RUN apt-get -y install python python-pip git-core
RUN git clone https://github.com/smirolo/eb-minimal-flask.git
RUN pip install eb-minimal-flask/requirements.txt

EXPOSE 80

CMD ["/usr/bin/python", "eb-minimal-flask/hello.py" ]
Containers do not contain. A misconfiguration in the "host" system could affect the installation process in the Docker container. In the comments on the issue, there is mention of a fix for the latest CentOS, so I switched to the following Dockerfile.
FROM centos:latest

# RUN rpm --import http://mirror.centos.org/centos/RPM-GPG-KEY-CentOS-7
# RUN rpm -Uvh http://download.fedoraproject.org/pub/epel/beta/7/x86_64/epel-release-7.0.1406.noarch.rpm
RUN yum install -y python python-virtualenv git-all gcc
# gcc because markupsafe pulled as dependency for Flask
RUN git clone https://github.com/smirolo/eb-minimal-flask.git
RUN virtualenv-2.7 virtualenv
RUN virtualenv/bin/pip install -r eb-minimal-flask/requirements.txt

EXPOSE 80

CMD ["virtualenv/bin/python", "eb-minimal-flask/hello.py" ]
A few things to mention here. First, CentOS does not have a python-pip package. There is a RPM in the EPEL 7 beta repository but at the time of writing, it provides pip 1.3.1 while the pip version installed through the python-virtualenv package in core CentOS 7 beta is 1.4.1. Second, Flask depends on markupsafe which compiles some C code as part of its installation through pip. I didn't yum search for marksafe and instead installed gcc in the container. After all, the plan for this post is to deploy a minimal Docker container on Elastic Beanstalk...
$ cat Dockerfile
FROM centos:latest

# RUN rpm --import http://mirror.centos.org/centos/RPM-GPG-KEY-CentOS-7
# RUN rpm -Uvh http://download.fedoraproject.org/pub/epel/beta/7/x86_64/epel-release-7.0.1406.noarch.rpm
RUN yum install -y python python-virtualenv git-all gcc
# gcc because markupsafe pulled as dependency for Flask
RUN git clone https://github.com/smirolo/eb-minimal-flask.git
RUN virtualenv-2.7 virtualenv
RUN virtualenv/bin/pip install -r eb-minimal-flask/requirements.txt

EXPOSE 80

CMD ["virtualenv/bin/python", "eb-minimal-flask/hello.py" ]
$ docker build -t eb-minimal-flask .
We have our Dockerfile, built it locally and it works. Let's deploy it to Elastic Beanstalk.
by Sebastien Mirolo on Sat, 26 Jul 2014